
The WebCanvascontrol is used for drawing graphics in web apps. It takes advantage of the HTML5 Canvas making it fast and powerful. Sometimes is can be useful to be able to save the graphics drawn in the WebCanvas to an image file, but unfortunately there is no built-in Xojo method to do this.
However, by using a little JavaScript you can easily add this capability to Xojo.
In order to follow this tutorial, create a new Webproject and add a new WebCanvascontrol from the Library to the default Web Page added to the project: WebPage1. With the WebCanvas selected in the Navigator, change its name to cCanvasusing the Inspector and add the PaintEvent Handler to it using the Insert > Event Handleroption from the menu. Use the following code to draw a black colored rectangle:
g.FillRect 0, 0, g.Width, g.Height
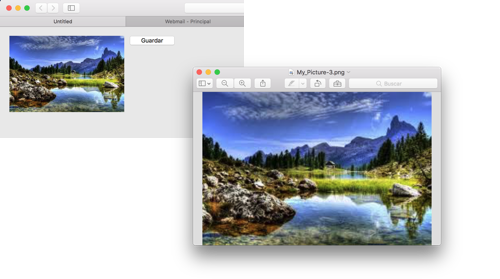
Obviously, you can draw anything you want in the WebCanvas or even painta picture on it. The achieved result will be the same. For example, we can draw a picture added to our project (with the filename “landscape”), using this line of code in the Paint event of our cCanvasinstance:
g.DrawPicture landscape, 0, 0, g.Width, g.Height
Retrieving the WebCanvas image data
The first interesting step is retrieving the underlying image represented by the WebCanvas and that is something we can get using a fragment of JavaScriptcode executed from the Xojo side. This is the process we will execute from the ActionEvent Handler of a WebButtonadded to the WebPage1from the Library. In fact, this will be the button in charge of calling the process to save the image as a picture file on the user disk.
Once the WebButton has been added to the WebPage from the Library, put the following code in its ActionEvent Handler:
Dim js() As String
js.Append "var canvas = document.getElementById('" + cCanvas.ControlID + "_canvas');" // We get the item reference based on its ID
js.Append "var img = canvas.toDataURL(""image/png;base64;"");" // We access to the image data, encoded as a base64 string
js.Append "document.location.hash=img" // We assign that data to the document Hash property, so we can retrieve it from the Xojo side

Dim execute As String = Join(js,"")

ExecuteJavaScript execute // Finally, we execute the JavaScript code
As you can see, the first line of the JavaScript code is in charge of retrieving the cCanvasreference from the DOM (document object model) of the Web Page. For that, we use the ControlIDproperty on our WebCanvas instance, adding the “canvas” appended by Xojo to all these kind of objects when generating the source code for the page.
Once we get the reference to our Canvas instance, the following line of code retrieves the picture content itself and assigns it to the imgvariable. The trickhere is that we retrieve that information in its URL format and, thus, encoded as Base64data that we can assign to other document properties without losing its original meaning.
Then, we assign the data to the document Hashproperty. This is the property that allows us to jump to other page sections previously tagged. However, we will use this property as a temporary storage container for passing the data between the HTML/JavaScript side of the web page and the Xojo side of our code. Why we do this? Well, because we can add the HashTagChangedEvent Handler to the Sessionobject so it will fire every time we change the value of the Hashproperty and we will be able to retrieve the data from that property.
Retrieving the image, from the Xojo side
So, the next step is adding the HashTagChangedevent to the Sessionobject of our example project, writing the following snippet of code in the associated Code Editor:
Dim data As String = DecodeBase64(Hashtag.NthField(",",2) ) // We retrieve the information saved in the Hash, but just the relevant data for the image and not the URL part.
wp = New WebPicture(data,"My_Picture.png") // We create a new WebPicture instance using the previously retrieved image data in the constructor, and giving a default file name for the image
wp.ForceDownload = True // We want to force the file download instead of showing it
ShowURL wp.URL // and finally we start the file download process.

Hashtag = "" // Let's empty the hash property, just to make sure that the event will fire even if the WebCanvas doesn't change its contents
As you can see, in the first line of code we retrieve the image data. We do that using the NthFieldcommand because we are only interested in the image data and not in the URL information that precedes it. In addition, we decode the previously encoded data as Base64, so we really get the bytes of the image in PNG format.
Once we get the picture data, we can use any of the available constructors for the WebPictureclass; in this case the one that lets us create a new image from the passed data. In addition, we use this class because it is a subclass of WebFile, and that means that it is simpler to force the download as an image file instead of showing its contents in a new web page.
In fact, this is what we achieve setting the ForceDownloadproperty to True, so when in the following line we use ShowURLwe will be forcing the download of the file instead of displaying the image as a new page in the browser. Goal achieved!
Download persistence
You probably noted that the wpvariable is not declared in the previous fragment of code. This is because we need to make sure that the object it points to is in scope during the file downloading process and won’t get destroyed once we exit the Event Handler (we would want a message error from the web browser in that case). The solution is pretty easy – we only need to add a new property to our Sessionobject, using the following values:
- Name: wp
- Type: WebPicture
- Scope: Private
Now, every time you run the app web and click the button, you’ll see how the web browser downloads the WebCanvas image as a PNG file to disk.
The Xojo programming language is fast and easy to grasp!
*Read this Tutorial in Spanish
Related Posts / Entradas Relacionadas

 October 8, 2018 Guardar imagen de WebCanvas a Disco
 August 14, 2019 Canvas: How to Create Custom UI Controls
 March 2, 2020 Crea un Control de Selección de Color
 May 14, 2016 Snippery 1.2: Syntax Highlighting and Color Schemes
- September 1, 2019 Web Services: Xojo Web, at your service